WARP v3: FPGA Configuration via SD Cards
The WARP v3 board includes an SD card slot and CPLD tied to the Virtex-6 FPGA's dedicated configuration pins. Together these circuits enable configuring the FPGA using bitstreams stored on the SD card. For more details on the hardware design, refer to the WARP v3 user guide.
The basic steps for SD card configuration:
- Generate a valid bitstream (.bit file) for the Virtex-6 FPGA
- Convert the .bit file into a correctly-formatted .bin file
- Copy the .bin file to the correct location on the SD card
Each step is discussed in detail below.
The SD cards shipped with WARP v3 kits are pre-programmed with a known good design that implements a simple counter displayed on the hex displays. To re-program your SD card with this design, use this file: w3_sd_newCard.bin.zip (unzip to retrieve the .bin file).
Generating the .bit file
A .bit file is the final output of the Xilinx ISE hardware synthesis and implementation processes. Before you can use the SD card for configuration, you must generate a valid .bit file for the FPGA on your board. You must have a valid .bit file before proceeding with the steps below.
Startup Clock
The .bit file stores both your design and various options which control the startup process of the FPGA itself. One startup option critical to configuration via the SD card is the "Startup Clock". For SD card configuration, the startup clock must be CCLK. All Xilinx tools rely on the bitgen program to create .bit files. However the tools use different methods to configure bitgen.
To set the startup clock:
ISE: Right-click on the "Generate Programming File" process and choose "Process Properties". Click "Startup Options", then change "FPGA Start-Up Clock" to "CCLK". The Startup Options should look like this:

Click OK and re-run the "Generate Programming File" process.
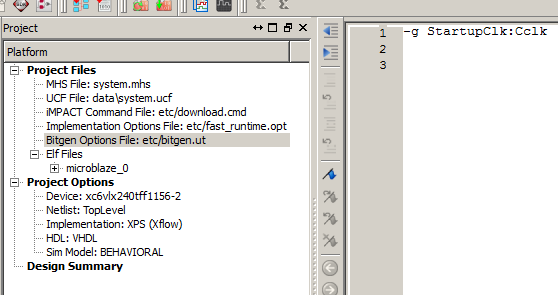
XPS: Switch to the Project tab and open the file "bitgen.ut". Replace the file contents with this one line:
-g StartupClk:Cclk
The updated bitgen.ut should look like this:
Save the file and re-run the "Generate Bitstream" process.
SDK: The SDK uses the system.bit file generated by the source XPS project. You must set the Startup Clock option in the original XPS project, then re-export the XPS hardware design to your SDK workspace. The bitstreams included in all WARP reference projects are already configured correctly.
Binary Format
Once you have a valid .bit file with the correct "Startup Clock" option, it must be converted to a .bin ("binary" format) file. Again, the method depends on your design flow.
ISE: Right-click on the "Generate Programming File" process and choose "Process Properties". Click "General Options", then check "Create Binary Configuration File". Click OK and re-run the "Generate Programming File" process. This will create a new .bin file in the same directory as the .bit file.
XPS: Remember that the XPS-generated system.bit does not include any software application. You can generate a .bin file in XPS, but it's not very useful. We recommend using the SDK steps below to generate a .bin version of the download.bit bitstream which includes hardware and software.
There is one flow where an XPS-generated .bin file is useful. You can configure the FPGA with your hardware design, then connect to the board via JTAG from the SDK and download/iterate/debug software projects. We don't use this flow much, but it will work. To generate system.bin in XPS, open "bitgen.ut" and add the line:
-g Binary:Yes
SDK: Unfortunately the SDK does not include any easy way to generate a .bin file. The SDK can generate download.bit, the bitstream which includes hardware and software designs. You must then use a command line tool to convert download.bit into a .bin file.
Updating download.bit
- Update your software design and ensure it compiles successfully.
- From the Xilinx Tools menu, choose Program FPGA.
- The Bitstream and BMM File fields will be automatically populated.
- In Software Configuration, choose the software binary you want to use. For example, if your software project is named "MySoftwareProj_sw" you should choose "MySoftwareProj_sw.elf".
- Click Program. This will update/generate download.bit.
It's ok if your WARP v3 node is powered off or JTAG isn't connected. This dialog box actually triggers two processes: using data2mem to insert your software binary into the block RAMs represented in the existing system.bit, then using iMPACT to download the new download.bit to the FPGA. The first step will succeed even if the second fails (i.e. because there's no JTAG connection).
Converting download.bit
- In the SDK, choose Xilinx Tools -> Launch Shell.
- The new command prompt will start in the SDK workspace directory. CD to the hardware project directory. For example, if you're using the WARP template project, you would run "cd WARPv3_TemplateProject_v0_hw_platform".
- Confirm the hardware project directory contains system.bit and download.bit.
- Run: promgen -u 0 download.bit -p bin -spi -w
- Confirm promgen created/updated the file "download.bin"
When you've generated the .bin file, you're ready to copy it to an SD card. See below for more details.
Copying .bin Files SD Cards
Now that you've generated a valid binary configuration file (.bin), you must copy it to a specific location on an SD card.
 | WARNING: the tools for writing binary files to arbitrary locations on the SD card are also capable of overwriting critical areas of your computer's hard drive. Always verify the output device descriptor before running these tools. |
The default WARP v3 CPLD design loads configuration files from the SD card starting at an offset of 64MB. Up to 8 configuration files can be stored per card, with each file separated by 16MB. The active configuration file is selected by the config DIP switch on the WARP v3 board. You must choose which "slot" when copying the .bin file to the SD card.
We use the open-source dd tool to write configuration files to SD cards. dd is available for OS X, Linux and Windows (and probably other OSs). Each call to dd copies one configuration file. There are four required arguments:
dd bs=512 seek=<base_block_addr> if=<config_file.bin> of=<sd_device_descriptor>
Variables to replace:
- <sd_device_descriptor>: Device descriptor for SD card (OS specific; see below)
- <config_file.bin>: Input file (your .bin file)
- <base_block_addr>: Staring address for the output file, in units of block size. Use (131072 + slotNum*32768) for standard WARP v3 config design:
- Slot 0: 131072
- Slot 1: 163840
- Slot 2: 196608
- Slot 3: 229376
- Slot 4: 262144
- Slot 5: 294912
- Slot 6: 327680
- Slot 7: 360448
The specific calls to dd depend on your operating system.
Attachments (3)
- ise_bitgen_cclk.png (24.0 KB) - added by murphpo 12 years ago.
- xps_bitgen_cclk.png (25.2 KB) - added by murphpo 12 years ago.
- w3_sd_newCard.bin.zip (612.6 KB) - added by murphpo 11 years ago.
Download all attachments as: .zip