| Version 2 (modified by murphpo, 10 years ago) (diff) |
|---|
XPS to PlanAhead Project Conversion
The following process describes how to create a PlanAhead project from an existing XPS project. This process has been tested in ISE 14.4 and 14.7. It is likely that this flow is different or broken in earlier versions of the Xilinx tools.
Overview
The steps below use a few placeholder names:
- <src_xps_proj>: root of your existing XPS project. This is the folder containing your system.xmp and system.mhs files.
- <pa_proj_dir>: root of your new PlanAhead project. This folder should be empty before creating the PlanAhead project.
- PA_PROJ: name of your new PlanAhead project
Creating the PlanAhead Project
- Launch Xilinx PlanAhead
- Select Create New Project, click Next
- Enter your choice of project name. We'll refer to this as PA_PROJ below
- Enter a project location. We'll refer to this as <pa_proj_dir> below
- Click Next
- Select RTL Project and check Do not specify sources at this time
- Click Next, then select your FPGA device (xc6vlx240tff1156-2 for WARP v3 projects)
- Click Next then Finish
You should now see the PlanAhead workspace.
Creating the PlanAhead XPS Source
- Start in the PlanAhead workspace and find the Sources tab, probably in the upper-left of the Project Manager sub-pane.
- Right-click and select Add Sources
- Select Add or Create Embedded Sources then click Next
- Click Create Sub-Design
- Enter a top-level module name. We'll use xps_top here.
- Click Ok, then Finish
- XPS will launch on top of the PlanAhead workspace. You should see a dialog box asking: "This project appears to be a blank project. Do you want to create a Base System using the BSB Wizard?". Click No.
- You should now see a blank XPS project:
![]()
- Minimize the XPS window but do not close XPS
At this point you have two XPS projects. The XPS project inside the PlanAhead project is blank and must be updated with the hardware design from your original XPS project.
- Navigate to <pa_proj_dir>/PA_PROJ.srcs/sources_1/edk/xps_top. This is the root of your new XPS project.
- From your source XPS project folder, copy the following into the new XPS project folder:
- The contents of the pcores, drivers and sw_services folders (if they exist)
- Any data/*.prj files, such as data/DDR3_SODIMM_mig_saved.prj in Mango reference designs
- Do not copy any UCF files from your old project. These will be handled below
- Copy and paste the contents of the old MHS file into the new MHS file
- Copy from <src_xps_proj>/system.mhs
- Paste into <pa_proj_dir>/PA_PROJ.srcs/sources_1/edk/xps_top/xps_top.mhs
- Save the modified xps_top.mhs, then close XPS.
If XPS throws an error, you probably forgot to copy cores/code from the old XPS project. Also double check that your edk_user_repository is up to date and that the edk_user_repository is in the Global Peripheral Repository Search Path in the XPS preferences (see for more).
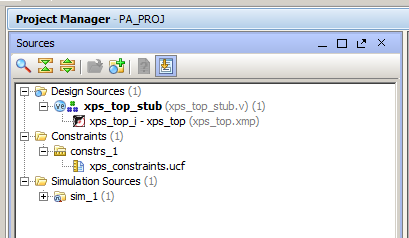
At this point your PlanAhead project has one source, the XPS project. You must now add a constraints file to the PlanAhead Project.
- In the PlanAhead workspace Sources tab, right-click and select 'Add Sources
- Select Add or Create Constraints then click Next
Attachments (7)
- xps_blank_proj.png (50.6 KB) - added by murphpo 10 years ago.
- pa_src_top_hdl.png (14.5 KB) - added by murphpo 10 years ago.
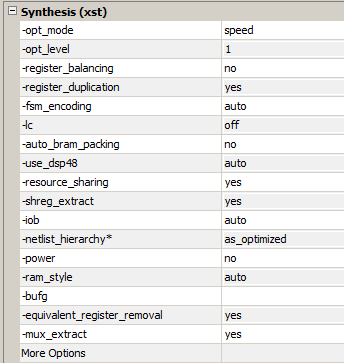
- pa_settings_xst.png (10.6 KB) - added by murphpo 10 years ago.
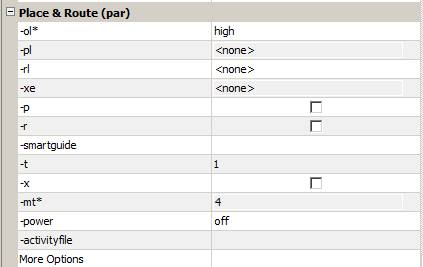
- pa_settings_par.png (6.7 KB) - added by murphpo 10 years ago.
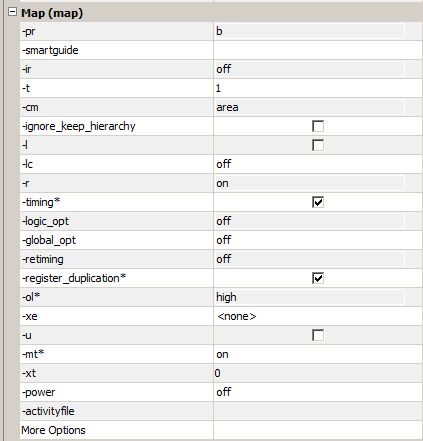
- pa_settings_map.png (11.1 KB) - added by murphpo 10 years ago.
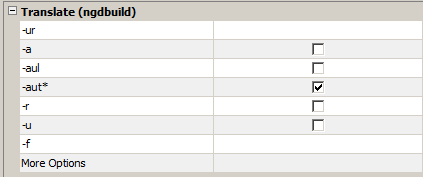
- pa_settings_translate.png (3.6 KB) - added by murphpo 10 years ago.
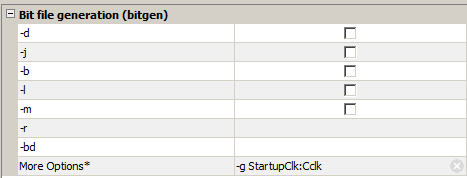
- pa_settings_bitgen.png (4.2 KB) - added by murphpo 10 years ago.
Download all attachments as: .zip