| Version 9 (modified by chunter, 12 years ago) (diff) |
|---|
Hello World
(compatible with WARP v2 and WARP v3)
In this exercise, users will be introduced to two tools that are used heavily in WARP development: the Xilinx Platform Studio (XPS) and the Software Development Kit (SDK). Users will use these tools to construct a simple "Hello World" software project that prints messages via UART to a terminal running on the user's PC and controls the User I/O on the board to run on and off LEDs and display numbers on the hexadecimal displays.
First, we briefly describe the tools that will be used in this exercise.
Xilinx Platform Studio (XPS)
Simply put, XPS is the tool that lets you connect your own custom FPGA designs to the custom constraints of the WARP v3 hardware. It also lets you draw from a library of Xilinx-provided peripheral cores (known as pcores) to use in your design. For example, to use the Ethernet hardware on WARP v3, the XPS project you use will need to instantiate an Ethernet MAC peripheral. For our designs, we use the Tri-Mode Ethernet Media Access Controller (TEMAC) to accomplish this. Also, XPS lets you instantiate a processor for running custom software known as MicroBlaze. To write code for MicroBlaze, a different tool known as the Software Development Kit (SDK) is used.
Software Development Kit (SDK)
The SDK will look very familiar to users who are comfortable with the Eclipse IDE. Basically, the SDK allows users to write custom C or C++ code to execute on the MicroBlaze processor. Furthermore, it natively supports step-by-step debugging of code as well as code profiling.
Instructions
- Download either the WARP v3 Template Project or the WARP v2 Template Project? according to the which hardware you are using.
- Extract the archive into a folder on your hard drive. Note: this folder must not contain any spaces in the path (this includes the the Windows desktop, as that lives in a folder known as "Documents and Settings").
- Rename the folder that contains the system.xmp file to remove the "_cleaned" suffix and replace it with "_helloworld." Note: because of the way the archive is constructed, the project folder may be in a subdirectory of the folder that comes out of unzipping process. Make sure to rename the lowest-level folder that contains the actual system.xmp project file.
- Launch Xilinx Platform Studio and click "Open Project." Navigate to the location of your project and open the system.xmp file in the project folder.
- If this is the first time you have run XPS, you will receive a number of error messages saying that cores cannot be found. XPS must be told where to find the WARP SVN repository in order for it to find these files. In XPS, click Edit->Preferences. Then, under the "Application" category, click "Browse ..." under the "Global Peripheral Repository Search Path." Navigate to and select the "edk_user_repository" folder on your hard drive. If you do not have an "edk_user_respotory" SVN working copy, please see our SVN documentation. After making this selection, close and reopen XPS. This step of adding the global repository path only needs to be done once per installation of the Xilinx tools.
- Once the project is open, click "Generate BitStream" under the "Hardware" menu. This step will take some time. XPS provides a busy indicator animation in the bottom right to show you that it is working on generating the bitstream. Furthermore, the "Console" tab at the bottom of the screen can be open while the bitstream is being generated. Log messages will be printed here.
- In Windows Explorer, navigate to the location of your project folder on your hard drive. Inside this project folder, you will find the system.xmp file as well as a few other folders. Create another folder at this level (e.g. the same level as "import") and name it "workspace."
- With XPS still open, launch the Xilinx SDK from the Start Menu. It will ask you to select a workspace. Click "Browse ..." and navigate to the "workspace" folder you just created. Click OK. Now close the SDK and return to XPS.
- In XPS, go to the "Project" menu item and click "Export Hardware Design to SDK..." Then, click "Export & Launch SDK." This will use the workspace you pointed to in the SDK in the previous step. Simply click "OK" at the window that pops up that asks you to select your SDK workspace.
- At this step in the process, you can close XPS. We'll be working in the SDK exclusively for the rest of the exercise.
- Rather strangely, the Xilinx SDK does not automatically know about software drivers to custom peripherals in your XPS project. You have to explicitly tell the SDK where to find your hardware project. This is a step you have to do with every new SDK workspace. In this exercise, we do not have any custom peripherals, but it is still a good habit to get into. Click on the "Xilinx Tools" menu item and select "Repositories." Here, you want to ensure two things:
- In Local Repositories, you want to point the SDK to the folder that contains the XPS project system.xmp file. Click on "New..." and navigate to and select this folder.
- In Global Repositories, you want the SDK to point to the edk_user_repository folder on your hard drive. Unlike the local repositories, the SDK does remember this setting across workspaces. You'll only need to manually add the edk_user_repository the first time you run the SDK.
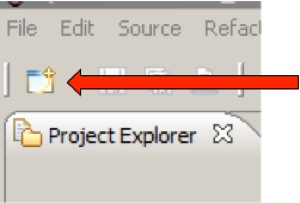
- Now, we need to create what is known as a "Board Support Package" (BSP). A BSP is basically a project of supporting software for your own software project. It is a collection of drivers for peripherals in your design as well as higher-level software like a TCP/IP networking stack if you need it. Click on the button on the far left of the screen just above the "Project Explorer."
- Click on "Xilinx Board Support Package" and click "Next."
- Rename the project from "standalone_bsp_0" to "helloworld_bsp_0." Do not change any other setting on this page. Click "Finish."
- A new window will pop-up that allows you configure the BSP with various optional software packages. For the purposes of this exercise, the default settings are fine. Just click OK. You will see the console at the bottom of the screen start printing messages as the SDK compiles the BSP. It will end up with "Finished building libraries" printed to the console.
- We're now ready build the actual software project that will do the Hello World printing and User I/O control. Click the same "new" button above the "Project Explorer."
- Click "Xilinx C Project" and then click "Next."
- We are not going to use the Xilinx-provided "Hello World" example. Click "Empty Application" under the "Select Project Template" dialog. This will rename the project to "empty_application_0." Change that name back to "helloworld_0." Click "Next."
- We have already created a BSP, so we do not want this dialog box to make another one for us. Click the radio button next to "Target an existing Board Support Package." The "helloworld_bsp" will be automatically highlighted. Click "Finish"
- In the Project Explorer on the left side of the SDK, you will see the helloworld_0 project. Click the + next to it and it will reveal a "src" folder.
- In Windows Explorer (i.e. not in the SDK), navigate to the directory that contains the XPS project system.xmp. Then navigate to the import/WARPvX_TemplateProject_vX_sw/src" directory (where X depends on your hardware and the latest version of the template project).
- Drag the "warpvX_example.c" project into the src folder inside the SDK project explorer window under the helloworld_0 project. This will copy this source file into your SDK project.
- In the SDK, double click the warpvX_example.c file to open it in the editor. At this point, you can look through this source code and see that it basically will print some messages to the terminal and will count upwards, displaying the current count on the hexadecimal displays on the WARP board and the LEDs.
- Right click on the helloworld_0 software project and click "Generate Linker Script." Here, we will assign instruction and data pieces of our code to various pieces of memory in our XPS hardware project. Assign the following:
- The code sections to "xps_bram_if_cntrl_0"
- The data sections to "ilmb_cntrl_dlmb_cntlr"
- The heap and stack to "xps_bram_if_cntlr_1"
- Click "Generate" and then "Yes" to the message that says you are going to overwrite an existing linker script. The console will print messages and end with "Finished building: helloworld_0.elf.elfcheck"
At this point, the software project is complete and ready to be tested on the hardware. Unfortunately, there are bugs in the SDK for designs that use a PowerPC instead of a Microblaze, so the instructions for the WARP v2 and WARP v3 hardware diverge at this point.