WARP FPGA Configuration
USB Configuration
The easiest way to configure the FPGA is to use the on-board USB configuration circuit. This circuit emulates a Xilinx Platform USB Cable, the drivers for which are included with Xilinx ISE 8.2 and newer. To use this interface, connect the WARP FPGA Board's USB port directly to your PC using a standard USB cable. The first time you connect a board to your PC, Windows will prompt you to search for and install drivers. Allow Windows to complete this process before attempting to configure the FPGA.
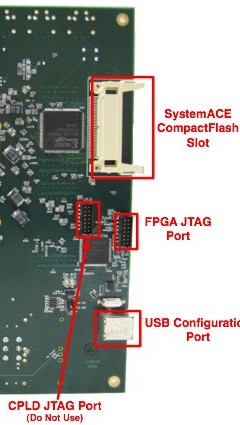
The WARP FPGA board's USB connector is on the back of the board and is highlighted in the image above.
External JTAG Cable
Some PCs do not support the USB configuration circuit on the FPGA board. Windows Server 2003, for example, is incompatible with Xilinx's USB drivers. In these situations, you can configure the FPGA using an external Xiilnx JTAG cable. The WARP FPGA board has a standard JTAG connector which is compatible with both the Xilinx Parallel IV and Platform USB cables.
The WARP FPGA board's JTAG connector is on the back of the board and is highlighted in the image above. On the board this connector component J51 labaled 'SysACE'. There is a second, identical connector (J49) on the board used to configure a CPLD in the USB configuration circuit. Do not use this connector.
SystemACE CompactFlash
 The WARP FPGA board also includes Xilinx's SystemACE CompactFlash chip for managing the configuration process of the FPGA. The SystemACE chip acts as an interface between the FPGA and a standard CompactFlash slot.
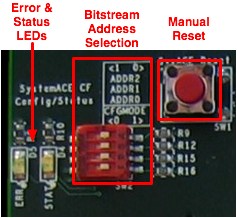
The SystemACE automatically configures the FPGA on powerup or when the manual reset button is pushed. Multiple configuration files can be stored on the CF card. The SystemACE chip reads a 3-bit address from a DIP switch to choose one of eight configuration files. The fourth position on the DIP switch, labeled CFGMODE, should generally be set to 1 (slid to the right).
Two LEDs indicate the status of the SystemACE controller. The green LED will glow when the controller has successfully configured the FPGA using a bitstream on the CompactFlash card. The red LED will blink when no CompactFlash card is installed; it will glow continuously if there was an error downloading a bitstream to the FPGA. These LEDs do not indicate the status of the FPGA's configuration if you are not using the SystemACE to configure the FPGA.
Other References
- Xilinx SystemACE CF datasheet
- WARP FAQ: How to format CompactFlash cards
- WARP FPGA Board Schematics (pgs. 7 and 14)
